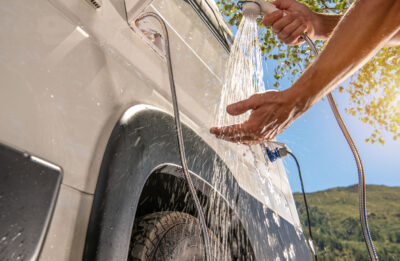
Maintaining a clean and safe water supply in your RV is essential for health and comfort during your travels. Over time, bacteria and mold can accumulate in the fresh water tank, especially if the RV has been unused for a while. Regular sanitation ensures that your water remains fresh and free from harmful contaminants. But most users always find it challenging and wonder How to sanitize RV fresh water tank?
The process involves draining the tank, preparing a sanitizing solution—typically a mixture of bleach and water—and circulating it through the entire water system. After allowing the solution to sit for several hours, you’ll drain and flush the system thoroughly to remove any residual bleach, leaving your water system clean and ready for use.
What You’ll Need to Sanitize Your RV Fresh Water Tank
Sanitizing your RV’s fresh water tank requires the right tools and materials to ensure a thorough and effective cleaning process. Having everything you need prepared ahead of time makes the task easier and ensures that you complete it properly. Here’s a list of what you’ll need to sanitize your RV’s fresh water tank:
- Household Bleach
- You’ll need unscented household bleach to create the sanitizing solution. The bleach acts as a disinfectant, killing bacteria, mold, and other pathogens inside the tank. Use 1/4 cup of bleach for every 15 gallons of fresh water the tank holds.
- Fresh Water
- You’ll need fresh, clean water to dilute the bleach and to fill the tank for flushing out the system. Make sure the water is potable to avoid introducing contaminants.
- Measuring Cup or Funnel
- A measuring cup or funnel will help you accurately measure the bleach before adding it to the tank. This ensures you use the correct amount of bleach for your tank size.
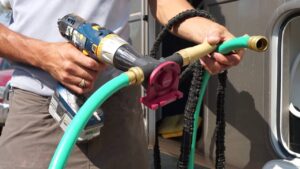
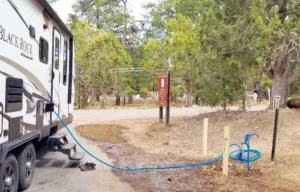
- Water Hose
- A clean water hose is essential to refill the tank with fresh water once the sanitizing solution has been flushed out. Make sure the hose is free from any contaminants that could affect the water quality.
- Rubber Gloves
- It’s a good idea to wear rubber gloves when handling bleach or working inside the tank to protect your skin from irritation or burns.
- Bucket or Large Container
- A bucket can be useful for mixing the bleach solution before adding it to the tank, especially if your tank is smaller and easier to pour into directly.
- Faucet Wrenches (Optional)
- If you encounter any issues with the faucets or water system, faucet wrenches may be needed to remove or adjust parts for easier cleaning.
- Water Pump
- Your RV’s water pump will circulate the bleach solution throughout the system, ensuring the water reaches all pipes, faucets, and the water heater.
- Timer or Clock
- A timer or clock will help you keep track of how long the bleach solution has been sitting in the system. It’s important to let it sit for at least 4-6 hours for effective sanitation.
Having the right tools and supplies on hand is crucial to sanitizing your RV’s fresh water tank effectively. By gathering these items before you start, you can ensure that the entire process goes smoothly and that your water system remains clean and safe for use. Regular sanitation of your RV’s water tank will help prevent bacterial growth and keep your water fresh throughout your travels.
Preparing Your RV for Sanitization
Before you begin the sanitization process for your RV’s fresh water tank, it’s essential to properly prepare the RV. Taking the time to ensure everything is in place will make the job easier and ensure the sanitization process is thorough. Below is a detailed guide on how to prepare your RV for sanitization:
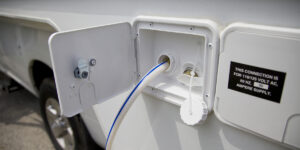
- Turn Off the Water Supply
- First, ensure that the water supply to your RV is turned off. This prevents any new water from entering the system while you are working on it and helps avoid spills or accidental flooding.
- Drain the Fresh Water Tank
- Open all the faucets in your RV to drain the water from the fresh water tank. Don’t forget to drain the water heater as well, as this is part of the system that needs to be sanitized too. Make sure that all water lines are fully emptied.
- Close All Faucets and Water Valves
- Once the tank and system are drained, close all faucets and water valves to ensure that no water enters while you’re adding the bleach solution. This step helps maintain control over the process.
- Check for Leaks or Damages
- Take a moment to inspect the water system, including pipes and connections, for any visible leaks or damage. If you notice any issues, address them before starting the sanitization process. Leaking pipes or fittings can interfere with the sanitizing process and waste water.
- Gather Sanitizing Materials
- Before starting the sanitization, gather all necessary materials such as unscented bleach, clean water, rubber gloves, and a measuring cup. Having everything you need in one place will make the process quicker and more efficient.
- Ensure the Water Pump is Working
- Verify that the water pump is functioning properly. The water pump will help circulate the sanitizing solution throughout the entire RV water system. If the pump isn’t working, you may need to address any issues with it before proceeding.
- Remove Any Water Filters
- If your RV has water filters installed in the system, it’s a good idea to remove them before beginning the sanitization process. The bleach can damage or degrade the filters, so it’s better to sanitize without them in place. After sanitization, you can replace the filters.
- Ventilate the Area
- Open the windows or vents in the RV to allow for adequate ventilation while you are handling bleach and other cleaning solutions. Good airflow will help minimize bleach fumes and create a safer environment.
Properly preparing your RV before sanitization is key to ensuring an effective cleaning process. By draining the water, checking for leaks, and gathering your supplies, you can streamline the entire task. Once your RV is prepared, the sanitization process will go smoothly, ensuring that your fresh water tank remains clean and free of harmful bacteria for your travels.
How to sanitize rv fresh water tank?
Sanitizing your RV’s fresh water tank is important to maintain clean, safe water for drinking, cooking, and bathing. Over time, bacteria and other contaminants can accumulate in the tank, which is why periodic cleaning is necessary. Here’s a detailed guide on how to sanitize the RV fresh water tank:
- Empty the Tank
- Begin by draining all the water from the tank. Open all faucets, both inside and outside, to ensure that all water is flushed out of the system. This will make room for the sanitizing solution.
- Prepare the Sanitizing Solution
- Mix a sanitizing solution using 1/4 cup of bleach for every 15 gallons of fresh water your RV’s tank holds. Ensure that you are using unscented household bleach.
- Add the Solution to the Tank
- Pour the bleach solution into the fresh water tank. Make sure the tank is completely filled with the solution, as this ensures that all internal surfaces are sanitized.
- Circulate the Solution
- Turn on the water pump and open each faucet, both hot and cold, until you can smell bleach. This indicates that the solution is circulating throughout the entire water system, including the pipes and the water heater.
- Let the Solution Sit
- Allow the bleach solution to sit in the system for at least 4-6 hours, preferably overnight. This gives the solution enough time to kill bacteria and sanitize the tank and pipes.
- Flush the System
- After the waiting period, drain the tank and flush out the entire system by running fresh water through all faucets. Continue flushing until there is no bleach smell remaining in the water.
- Fill and Test
- Fill the tank with fresh water again, and open the faucets to check if the water is clear and free from any bleach residue.
By following these steps, you ensure that your RV’s fresh water tank is properly sanitized and free of harmful contaminants. Regular sanitizing of the water system will provide you with clean, safe water for all your needs while traveling.
Post-Sanitization Maintenance Tips
After you’ve successfully sanitized your RV’s fresh water tank, it’s important to maintain the system to ensure it stays clean and free from contaminants for your next use. Below are some post-sanitization maintenance tips to keep your water system in good condition:
- Flush the System Regularly
- After sanitizing, regularly flush the system with clean water. This will help prevent any build-up of bacteria or minerals that can accumulate over time. It’s a good habit to flush your system every time you use the water after a long period of storage.
- Inspect for Leaks
- Periodically check the water lines, pipes, and fittings for leaks. Even small leaks can lead to water contamination and damage over time. Early detection will help prevent bigger issues.
- Change the Water Filters
- If you use water filters in your RV, make sure to replace them regularly, especially after sanitization. Over time, filters can become clogged or ineffective, reducing water quality.
- Check for Odors or Unusual Tastes
- Pay attention to the smell or taste of the water once you start using it again. If you notice any foul odor or off-taste, it could be a sign that sanitization didn’t remove all contaminants or that the water system needs further attention.
- Use a Water Softener
- Consider using a water softener if you’re traveling in areas with hard water. Hard water can lead to mineral deposits and buildup in the tank and pipes, which can affect both the taste and the efficiency of your water system.
- Maintain the Water Heater
- If your RV has a water heater, clean it periodically to remove any sediment or buildup. This is particularly important if you notice that the water isn’t heating as efficiently as it should.
- Keep the Fresh Water Tank Covered
- When not in use, try to keep the fresh water tank covered and shaded from the sun. Exposure to sunlight can encourage algae growth, which can contaminate the water.
- Store Your RV Properly
- When storing your RV for an extended period, make sure to drain the fresh water tank completely and sanitize it before closing up for storage. This will prevent mold and bacteria growth during the downtime.
- Monitor the Tank’s Condition
- Periodically inspect the fresh water tank for any signs of wear, corrosion, or damage. Catching issues early can save you from costly repairs down the road and ensure the tank remains in good condition.
Maintaining your RV’s fresh water tank after sanitization is key to ensuring clean, safe water for your future travels. By following these maintenance tips, you’ll help prolong the life of your water system and avoid any unpleasant surprises on the road. Regular inspections, flushing, and proper care will keep your RV’s water system in top shape, so you can enjoy fresh water wherever your journey takes you.
Common Mistakes to Avoid
When sanitizing your RV’s fresh water tank, it’s easy to make mistakes that can compromise the cleanliness of your water system or make the process less effective. Avoiding these common errors can ensure that the sanitization is done correctly and that your water stays safe to use. Here are some common mistakes to avoid:
- Using Scented Bleach
- One of the most common mistakes is using scented or thickened bleach. Always opt for unscented, regular bleach when sanitizing your tank. Scented bleach contains chemicals that could contaminate the water or leave an undesirable taste.
- Not Draining the Tank Completely
- Failing to fully drain the tank before sanitizing can result in stagnant water mixing with the sanitizing solution. This could lead to ineffective cleaning. Make sure to drain all water from the system, including the water heater, before beginning the sanitization process.
- Not Circulating the Solution
- It’s important to circulate the bleach solution throughout the entire water system, including the pipes, faucets, and water heater. If you skip this step, you might leave areas in the system unsanitized, allowing bacteria to persist.
- Using Too Much Bleach
- Adding excessive amounts of bleach is another mistake to avoid. Too much bleach can leave a strong chemical taste or cause damage to the water system. Stick to the recommended ratio of 1/4 cup of bleach per 15 gallons of water.
- Not Flushing Properly After Sanitizing
- After the sanitizing solution has sat for several hours, it’s crucial to flush the system thoroughly with clean water to remove all traces of bleach. Failing to flush adequately can result in bleach residue affecting the water’s taste or safety.
- Skipping Regular Maintenance
- Sanitizing your RV’s water system isn’t a one-time job. Skipping regular maintenance or sanitizing it infrequently can lead to buildup of bacteria or other contaminants. Regular flushing and cleaning are necessary to maintain a healthy water system.
- Not Checking for Leaks
- Before you begin the sanitization process, it’s important to inspect the system for leaks. If there are any leaks or damages, the solution won’t reach all areas of the system, leaving parts unsanitized. Always check the water lines, pipes, and faucets before proceeding.
- Sanitizing Without Removing Filters
- If your RV has water filters, remember to remove them before sanitizing. The bleach can damage the filters, rendering them less effective or even unsafe to use. Replace the filters after the sanitization is complete.
- Not Using the Correct Equipment
- Failing to gather the proper tools and equipment ahead of time (such as a measuring cup, funnel, and rubber gloves) can make the sanitizing process more difficult and less effective. Always be prepared with the necessary supplies.
- Ignoring Water Temperature
- Some RV owners overlook the importance of water temperature when sanitizing. If the water is too hot or too cold, it may affect how well the bleach solution works. Ideally, use lukewarm water for mixing the sanitizing solution.
Avoiding these common mistakes will ensure a thorough and effective sanitization of your RV’s fresh water tank. By taking your time, following the correct procedures, and maintaining your system regularly, you’ll keep your water safe and fresh for all your trips. Proper sanitization is key to maintaining a clean and healthy water supply throughout your RV adventures.
Conclusion
To ensure your RV’s fresh water tank remains clean and safe, regular sanitization is key. First, drain the tank completely and rinse it out thoroughly. Then, mix a sanitizing solution with water, typically using unscented household bleach, and pour it into the tank. Fill the tank with fresh water, close all the valves, and let the solution sit for a few hours.
Afterward, flush the system by running the water through all taps, ensuring the solution is completely washed out. How to sanitize RV fresh water tank? By following these steps, you’ll maintain clean, drinkable water and prolong the life of your RV’s plumbing system.