
Wiring a 50 amp RV plug requires a solid understanding of electrical systems and the right safety measures. How to wire 50 amp RV plug is an essential skill for RV owners who want to ensure they can connect their vehicle to a reliable power source.
It’s important to use the correct materials, follow electrical codes, and ensure everything is properly installed to handle the high electrical load safely. With the right approach, you can create a functional and secure power setup for your RV.
What You’ll Need
Before you begin wiring a 50 amp RV plug, it’s essential to gather all the necessary tools and materials. Ensuring you have the right equipment will help you complete the project safely and efficiently. Here’s a detailed list of what you’ll need:
- 50 Amp RV Plug
A 50 amp plug is required for RVs to handle the power demands. Make sure it matches the specific type for your RV. - 50 Amp Extension Cord or Cable
A heavy-duty 50 amp extension cord or cable with the correct gauge (typically 6/3 or 4/3) is necessary to handle the current flow safely. - Wire Strippers
A wire stripper will help you remove the insulation from the wires without damaging them, making it easier to connect the wires securely. - Screwdriver or Drill
You’ll need a screwdriver or drill to tighten the screws on the terminal connections of the RV plug. - Cable Clamp or Strain Relief
A strain relief clamp will secure the cable at the plug, preventing any stress on the connections. - Electrical Tape
Electrical tape is useful for securing any exposed wire ends or insulation and ensuring a tight, safe connection. - Voltage Tester
A voltage tester is essential for checking the connections and ensuring everything is working properly and safely. - Safety Gear (Gloves, Goggles)
Always wear gloves and goggles to protect yourself from accidental shocks or debris while working with electrical components. - Wire Connectors or Lugs
These connectors or lugs will be used to secure the wires to the terminal posts on the RV plug. - Multimeter
A multimeter can be used to test the power at various stages of installation, ensuring that everything is connected correctly.
Having all the necessary tools and materials at hand will make the process of wiring your 50 amp RV plug more straightforward and safe. Being prepared ensures that the installation is done correctly, reducing the risk of electrical issues and helping your RV run smoothly.
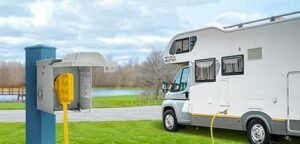
Understanding the 50 Amp RV Plug and Circuit
Understanding the 50 amp RV plug and circuit is crucial when setting up electrical connections for your RV. The 50 amp system is designed to provide the necessary power for larger RVs with multiple appliances and systems running simultaneously. Below is a breakdown of what you need to know about the 50 amp RV plug and its associated circuit:
- 50 Amp RV Plug Configuration
The 50 amp RV plug typically features a 4-prong connection: two hot wires (usually black and red), one neutral wire (white), and one ground wire (green). This setup is necessary to supply 240 volts to your RV, which is ideal for high-powered appliances like air conditioners, ovens, and other heavy-duty equipment. - 240 Volts Split Phase
A 50 amp RV plug operates on a 240-volt split-phase system. This means that the two hot wires (black and red) each provide 120 volts but are out of phase with each other. When combined, they provide 240 volts to power larger appliances efficiently. - Wire Gauge and Capacity
The wire used for a 50 amp circuit is typically a 6-gauge copper or 4-gauge aluminum wire. These wires can handle the current (up to 50 amps) without overheating. Proper wire gauge is critical for safety and to ensure the circuit can carry the load without loss of power or damage. - Circuit Breaker and Panel
A 50 amp circuit requires a 50 amp double-pole breaker in your electrical panel. The breaker protects your system from overloads and shorts by automatically cutting off power if the current exceeds safe limits. It’s important that the panel is rated to handle 240 volts. - Grounding
Proper grounding is a critical safety measure for any electrical installation. The green ground wire in the 50 amp RV plug connects to the ground terminal, which helps prevent electrical shocks and protects your RV’s appliances and systems from electrical faults. - The Importance of Neutral Wire
The neutral wire (white) is vital in completing the circuit and ensuring a balanced electrical load. It carries the return current from the appliances back to the source, preventing an imbalance that could cause system malfunctions or power issues. - Understanding the Power Load
A 50 amp circuit can supply up to 12,000 watts of power (240 volts x 50 amps). This capacity allows you to run multiple appliances, including two air conditioners, a microwave, refrigerator, and other systems commonly found in larger RVs. - Safety Considerations
When working with a 50 amp RV plug and circuit, safety is paramount. Always use a properly rated plug, circuit breaker, and wire to ensure the system can safely handle the load. Avoid overloading the circuit, and inspect all connections regularly for signs of wear or corrosion.
Understanding the 50 amp RV plug and circuit is essential for safely powering your RV. By ensuring that the system is correctly wired, grounded, and equipped with the proper components, you can enjoy a reliable and safe electrical setup while traveling or camping in your RV. Always prioritize safety and proper installation to prevent electrical hazards and maintain smooth operation.
Step-by-Step Instructions
Wiring a 50 amp RV plug is a detailed process that requires attention to safety and proper installation. Below are step-by-step instructions to guide you through wiring the 50 amp RV plug safely and efficiently.
Step 1: Gather Materials and Tools
Ensure you have all the necessary materials and tools from the previous section. This includes the 50 amp RV plug, wire, screwdrivers, wire strippers, voltage tester, and other equipment.
Step 2: Turn Off Power
Before starting, turn off all power sources, including the breaker in your home or at the RV hookup point. This is crucial for your safety to avoid any electrical shock while handling the wiring.
Step 3: Prepare the Wire
Cut a length of the 50 amp extension cord or cable according to the distance between your RV and the power source. Use the wire stripper to remove approximately 1.5 inches of insulation from each end of the wire, exposing the copper conductors (black, red, white, and green).
Step 4: Connect the Wires to the RV Plug
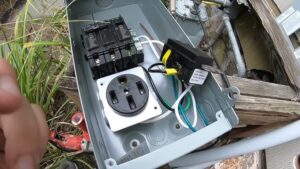
Take the 50 amp RV plug and open the casing to expose the terminal connections. You’ll notice four terminals labeled for each wire: two for hot wires, one for neutral, and one for ground.
- Hot Wires (Black and Red): These connect to the terminals labeled “Hot” or “Line.” Insert the black wire into one of the terminals and the red wire into the other, ensuring a secure fit by tightening the screws.
- Neutral Wire (White): Connect the white wire to the terminal marked “Neutral.” Tighten the screw securely.
- Ground Wire (Green): Finally, connect the green wire to the “Ground” terminal and tighten the screw.
Ensure that the wires are tightly secured and that there are no loose connections.
Step 5: Attach the Cable Clamp
Most 50 amp RV plugs have a strain relief clamp to prevent the wires from being pulled out. Slide the strain relief clamp over the cable where the wires are exposed. Tighten it to secure the cable and prevent stress on the terminals.
Step 6: Close the RV Plug and Secure
Once all the wires are connected and secured, carefully close the RV plug casing. Double-check that no wires are exposed and that the plug is tightly sealed.
Step 7: Install the 50 Amp Breaker
At the electrical panel, install a 50 amp double-pole breaker. This is essential for safely controlling the circuit and preventing overloads. Insert the breaker into the panel and connect the black and red wires from the 50 amp plug to the terminals of the breaker. Connect the white neutral wire to the neutral bus bar and the green ground wire to the grounding bar.
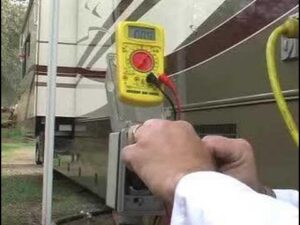
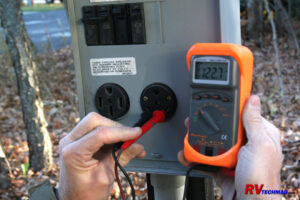
Step 8: Test the Circuit
Before fully powering the system, use a voltage tester to check for any wiring issues. Ensure that each terminal connection is correct, and verify that power is flowing through the circuit as expected.
Step 9: Turn On the Power
Once you’re confident that the wiring is correctly installed and secure, turn the power back on at the electrical panel. Flip the 50 amp double-pole breaker to the “ON” position and check the RV for a proper power supply.
Step 10: Final Check
Double-check all connections and inspect for any signs of overheating or loose wiring. If everything looks good, test your RV’s appliances and systems to ensure everything is running smoothly.
Wiring a 50 amp RV plug can seem like a complex task, but by following these step-by-step instructions, you can safely complete the installation. Always prioritize safety and double-check your work to ensure the wiring is done correctly. With the right preparation and knowledge, you’ll have a reliable power connection for your RV.
Troubleshooting Common Issues
When wiring a 50 amp RV plug, it’s important to be aware of potential issues that could arise during installation or operation. Here are some common problems you may encounter and troubleshooting tips to help resolve them.
- No Power to RV
Problem: After connecting the 50 amp RV plug, your RV isn’t receiving power.
- Possible Cause: The breaker may not be turned on, or there could be a loose or disconnected wire.
- Solution:
- Check the breaker in the electrical panel and ensure it is flipped to the “ON” position.
- Inspect the wiring connections at the RV plug and the breaker panel for any loose or disconnected wires.
- Use a voltage tester to verify power at the outlet.
- Tripped Circuit Breaker
Problem: The breaker trips immediately when power is turned on.
- Possible Cause: The circuit is overloaded, there is a short, or the wiring is not correctly installed.
- Solution:
- Verify that the breaker is the correct 50 amp double-pole type and rated for your system.
- Check for a short circuit by inspecting the wiring for exposed or damaged wires.
- Ensure that the plug is wired correctly, with the hot wires connected to the “Hot” terminals, neutral to the “Neutral” terminal, and ground to the “Ground” terminal.
- Make sure the electrical demand from the RV doesn’t exceed 50 amps, as that could trip the breaker.
- Blown Fuses in RV
Problem: Fuses in the RV are blowing or appliances are malfunctioning.
- Possible Cause: Overloaded circuit or faulty connections.
- Solution:
- Check the electrical usage inside your RV to ensure that you’re not running more appliances than the system can handle (over 50 amps).
- Inspect the wiring and connections for damage, loose connections, or corrosion.
- Replace any blown fuses in your RV and check the breaker panel for signs of faults.
- Spark or Arcing at Plug
Problem: Sparks or arcing occur when plugging in or unplugging the RV.
- Possible Cause: Poor connection or faulty wiring.
- Solution:
- Ensure that the 50 amp RV plug is properly wired and that all connections are tight.
- Check for wear or damage on the plug, especially around the terminals. If the plug appears damaged, replace it immediately.
- Clean the terminals and ensure they are free from corrosion or dirt.
- Voltage Drop
Problem: Appliances in the RV are not running properly or are underpowered, indicating a voltage drop.
- Possible Cause: The wire gauge may be too small, or there could be a loose or corroded connection.
- Solution:
- Verify that the wire gauge used for the circuit is appropriate (6/3 copper or 4/3 aluminum for 50 amps).
- Inspect all connections for tightness, ensuring that no loose or corroded terminals are affecting the voltage.
- If necessary, replace any damaged or corroded wiring to restore proper voltage.
- Grounding Issues
Problem: The RV experiences electrical shocks, or appliances are malfunctioning.
- Possible Cause: Improper grounding of the RV plug or circuit.
- Solution:
- Check that the ground wire is securely connected to both the plug and the electrical panel’s grounding bar.
- Inspect the ground connection in the RV to ensure that it’s properly wired and free of corrosion.
- Test the circuit with a voltage tester to confirm that grounding is correct and safe.
- RV Plug Doesn’t Fit or Connect Properly
Problem: The 50 amp RV plug doesn’t fit into the outlet or connection is loose.
- Possible Cause: Incorrect plug or outlet type, or wear and tear on the plug.
- Solution:
- Ensure that the RV plug and the outlet are both 50 amp, 240 volt, and properly matched.
- Inspect the plug for any damage, such as worn pins or cracked casing. If damaged, replace the plug.
- Make sure that the RV plug is inserted fully into the outlet and that the locking mechanism is engaging properly.
Troubleshooting common issues with a 50 amp RV plug is an essential part of ensuring a safe and functional electrical system. By carefully inspecting the wiring, connections, and electrical components, you can resolve most issues effectively. If problems persist or you’re unsure about performing any troubleshooting steps, it’s always a good idea to consult with a licensed electrician to ensure the system is safely installed and operational.
Safety Tips
When working with a 50 amp RV plug and electrical wiring, safety should always be your top priority. Handling electricity can be dangerous if proper precautions aren’t taken. Below are some essential safety tips to ensure a safe and successful installation or troubleshooting process.
- Turn Off Power Before Working
Always ensure the power is turned off before you begin working with any electrical components. This includes turning off the breaker in your home or RV electrical panel. Even when using a tester, always assume that power is live unless confirmed otherwise.
- Use Proper Personal Protective Equipment (PPE)
Wear safety gear such as insulated gloves and safety goggles to protect yourself from potential electrical hazards. These will help prevent electric shock and protect your eyes from flying debris when cutting or stripping wires.
- Use the Correct Tools
Make sure to use the right tools for the job, such as insulated screwdrivers, wire strippers, and a voltage tester. Using incorrect or damaged tools can increase the risk of electrical accidents or faulty installations.
- Verify Power with a Voltage Tester
Before handling any electrical connections, always test the outlet or circuit with a voltage tester to confirm there is no live power. Even if the breaker is off, double-checking will ensure you’re working safely.
- Inspect the Wiring and Connections
Always inspect the wiring, plugs, and outlets before making any connections. Look for signs of wear, fraying, or corrosion. Damaged wires or terminals can create serious electrical hazards, including short circuits or fires.
- Use Proper Wire Gauge
Ensure you’re using the correct wire gauge for your 50 amp RV plug installation. Typically, a 6/3 copper or 4/3 aluminum wire is needed to handle the 50 amp current. Using wires that are too small for the load can lead to overheating, fires, or electrical failures.
- Ground Everything Properly
Grounding is a critical safety feature in any electrical system. Ensure that the ground wire is properly connected to the RV plug, panel, and any other components that require grounding. Improper grounding can lead to electrical shocks, damage to your RV’s appliances, and fire hazards.
- Avoid Overloading the Circuit
50 amp circuits are designed to handle up to 12,000 watts. Avoid plugging in more appliances than the circuit can handle, as this could cause overheating, breaker trips, or electrical fires. Always balance the load appropriately, especially in a large RV.
- Check for Overheating
Once the system is powered on, regularly check for signs of overheating. Look for hot plugs, wires, or any unusual smells coming from the RV plug or breaker panel. If you notice any signs of overheating, immediately turn off the power and investigate the cause.
- Hire a Licensed Electrician If Unsure
If you’re not confident in your ability to wire the 50 amp RV plug correctly, or if you’re unsure about troubleshooting electrical issues, it’s always best to consult with a licensed electrician. Improper installations can lead to serious hazards, including fires, electrical shock, and damage to your RV.
Safety should always be a top priority when working with electricity. By following these safety tips, you’ll minimize the risk of accidents and ensure that your 50 amp RV plug is wired and functioning correctly. If you’re ever unsure about any part of the process, don’t hesitate to call in a professional to ensure everything is installed safely.
Additional Considerations
When wiring a 50 amp RV plug, there are additional considerations to keep in mind that go beyond the basic installation and safety tips. These factors will ensure that your electrical setup is reliable, efficient, and compliant with all standards. Here are some key points to consider:
- Compliance with Local Electrical Codes
Make sure that your installation complies with the National Electrical Code (NEC) or your local electrical codes. These codes are in place to ensure the safety of electrical systems and include specific guidelines for wiring and installation. Ignoring these codes can lead to potential hazards, as well as legal and insurance issues. Always check with local authorities or consult an electrician if you’re unsure.
- Dedicated Circuit for the RV Plug
For safety and to prevent overloading, it’s best to install the 50 amp RV plug on a dedicated circuit. This means the circuit should not be shared with other appliances or outlets in your home. A dedicated circuit reduces the risk of tripped breakers and potential overheating.
- Location of the Plug and Panel
When choosing a location for your RV plug and electrical panel, ensure that it is accessible and far from any potential hazards such as water sources or extreme weather conditions. Outdoor RV outlets should be weatherproof and installed according to code to prevent damage from rain, snow, or humidity.
- Long-Term Maintenance
Electrical systems, like any other part of your RV or home, require regular maintenance. Inspect the RV plug, wires, and connections periodically for wear and tear, corrosion, or loose connections. Keep the plug clean and free of dirt or debris, and replace any damaged or frayed wires to maintain safety and reliability.
- RV Power Management
Many RVs have power management systems that control how electricity is distributed among appliances. Be mindful of your RV’s power capacity and try not to overload the system by using too many high-power appliances simultaneously. Properly managing your energy use can extend the life of your electrical components and prevent circuit issues.
- Weatherproofing and Outdoor Use
If the 50 amp RV plug will be used outdoors, make sure the plug and receptacle are rated for outdoor use. Look for weatherproof covers to protect the plug from rain, snow, and dust. These will help prevent rust and corrosion, ensuring that the system stays functional for years.
- Surge Protection
Consider installing a surge protector or an RV-specific power management device between the power source and your RV. This can help protect your RV’s electrical components from voltage spikes, power surges, or lightning strikes that could cause significant damage.
- Voltage Imbalances
Although 50 amp circuits are designed for split-phase 240V, a voltage imbalance between the two hot wires (black and red) could cause problems with appliance operation and damage sensitive electronics in your RV. Use a multimeter or hire an electrician to ensure that both hot wires are providing the correct voltage and that the system is balanced.
- Extension Cords
If you need to use an extension cord to connect to the power source, ensure it’s rated for 50 amps and is long enough to avoid over-stretching. The cord should also be made of heavy-duty materials like rubber or thermoplastic to prevent damage from wear and outdoor conditions. Always check the condition of the extension cord before use.
- Plan for Future Upgrades
If you’re anticipating adding more power-hungry appliances or systems to your RV, consider installing a 50 amp system now, even if you don’t need the full capacity yet. This can save you time and money in the future when upgrading your RV’s electrical needs.
These additional considerations will help you plan a safer, more reliable, and efficient 50 amp RV plug installation. Proper installation, routine maintenance, and thoughtful planning for future upgrades can enhance your RV experience and ensure that your electrical system works seamlessly for years to come. Always stay informed about electrical safety and codes, and if in doubt, consult with a professional.
Conclusion
Wiring a 50-amp RV plug requires careful attention to safety and proper connection of the electrical components. It’s essential to ensure that the breaker, wires, and outlets are correctly sized and that all connections are secure to prevent any electrical hazards. With the correct tools, understanding the wiring diagram, and following safety precautions, wiring a 50-amp RV plug can be a straightforward process.
How to wire 50 amp RV plug involves connecting the proper wires to the respective terminals on both the plug and the electrical box, ensuring everything is grounded and insulated for a safe connection. Always double-check your work before use to ensure everything is done correctly and safely.