Wiring a 30 amp RV plug can be a straightforward task if you follow the proper steps and safety protocols. It’s essential to understand the electrical requirements of your RV and ensure the plug is compatible with your power source. At the same time, knowing the electrical requirements have alway made it a hassle for RV owners which now leads to the question How to wire a 30 amp RV plug? For most of them.
Whether you’re connecting to a campground outlet or setting up at home, knowing the right way to wire your RV plug will prevent electrical issues and keep everything running smoothly.
How to wire a 30 amp rv plug?
Wiring a 30 amp RV plug is a straightforward process, but it’s important to follow the correct steps to ensure safety and functionality. This guide will take you through the necessary steps, from gathering materials to making the connections, so you can wire your RV plug with confidence.
Materials Needed:
- 30 Amp RV plug (male)
- 10/3 AWG wire (with ground)
- Wire stripper
- Screwdriver
- Electrical tape (optional)
- A multimeter (for testing)
- Power source (circuit breaker)
Steps to Wire a 30 Amp RV Plug:
- Turn Off the Power
Before starting, make sure to turn off the power to the outlet you will be wiring to avoid any electrical accidents. - Prepare the Wire
Cut a length of 10/3 AWG wire, which includes three conductors: black (hot), white (neutral), and green (ground). Strip about 3 inches of the wire insulation from each end using a wire stripper. - Connect the Ground Wire
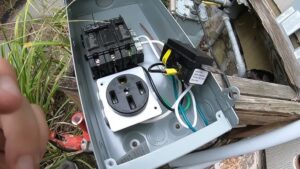
On the 30 Amp RV plug, identify the ground terminal, usually located at the bottom or side. Attach the green ground wire to this terminal and tighten the screw securely. - Connect the Neutral Wire
The white wire represents the neutral conductor. Locate the neutral terminal on the RV plug and attach the white wire, tightening the screw to ensure a secure connection. - Connect the Hot Wire
The black wire is for the hot (live) connection. Attach the black wire to the terminal labeled “hot” or “L”. Tighten the screw to hold the wire firmly in place. - Double Check All Connections
Make sure each wire is securely connected to its respective terminal. There should be no exposed wire beyond the terminal. - Test the Plug
Before using the plug, test the connections using a multimeter to ensure proper voltage and that no wires are loose. This will help avoid potential electrical issues when you plug your RV into the power source. - Cover and Secure
Once everything is connected, screw the plug casing back together. If necessary, wrap the connections in electrical tape to ensure they stay in place and are properly insulated.
Wiring a 30 amp RV plug is a simple yet important process that ensures you can safely connect your RV to an electrical source. Following these steps will help you set up the plug correctly, ensuring proper functionality and safety during use. Always double-check your work and, if unsure, consider consulting a professional electrician to avoid any potential risks.
Tools and Materials You’ll Need
Before wiring your 30 amp RV plug, it’s essential to gather the right tools and materials to ensure the process goes smoothly and safely. Below is a list of the tools and materials you’ll need for the job:
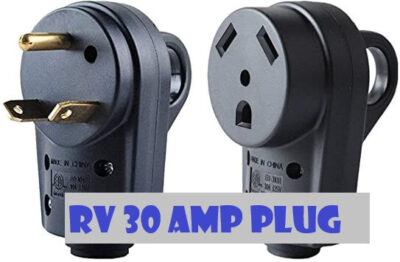
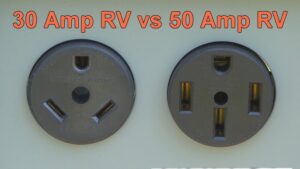
- 30 Amp RV Plug (Male)
This is the plug you will be attaching the wires to. It’s designed for a 30 amp, 120-volt power source, typically used for RV connections. - 10/3 AWG Wire
This wire includes three conductors: black (hot), white (neutral), and green (ground). The 10/3 gauge wire is thick enough to handle 30 amps of power. - Wire Stripper
A wire stripper is necessary to remove the insulation from the wires without damaging the conductors underneath. You’ll need to strip about 3 inches of insulation from each wire. - Screwdriver
A screwdriver will help you tighten the screws on the terminals of the RV plug. It’s important to use the right size to ensure a secure connection. - Electrical Tape (Optional)
Electrical tape can be used to further secure the wires or provide additional insulation on the connections, though it’s not always necessary. - Multimeter
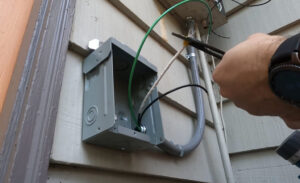
A multimeter allows you to test the connections once the wiring is complete. It will help you verify that the wiring is correct and that voltage is properly distributed. - Circuit Breaker or Power Source
You will need a power source, such as a circuit breaker, to connect the RV plug to an electrical outlet or a dedicated power panel.
Having all these tools and materials on hand will make the wiring process faster and safer, ensuring that your 30 amp RV plug is properly installed.
Safety Precautions
When wiring a 30 amp RV plug, safety is paramount to avoid electrical hazards or damage to your equipment. Follow these essential safety precautions to ensure a secure and safe installation:
Safety Precautions:
- Turn Off the Power
Always disconnect or turn off the power at the circuit breaker before starting any electrical work. This eliminates the risk of electrical shock while handling wires and the plug. - Use the Right Tools
Ensure you’re using insulated tools, such as wire strippers and screwdrivers, to prevent accidental shocks. Using proper tools also makes the job easier and reduces the chance of damaging wires or connectors. - Check for Proper Grounding
Make sure the ground wire is securely connected to the RV plug and that the plug’s grounding mechanism is intact. A loose ground wire can cause electrical faults or even fires. - Avoid Overloading the Circuit
A 30 amp RV plug is rated for a maximum of 30 amps of power. Ensure that your power source (such as the breaker or outlet) is rated to handle this load. Never use a 30 amp plug with a lower-rated circuit. - Use the Correct Wire Gauge
Use 10/3 AWG wire, which is designed to handle 30 amps of current. Using a wire gauge that is too small could result in overheating, damage, or even fire. - Inspect the Wiring Connections
Double-check all wire connections to ensure they are tight and secure. Loose connections can lead to sparks, overheating, and potential fire hazards. Ensure there are no exposed wires beyond the terminals. - Wear Safety Gear
Always wear rubber-soled shoes and gloves when working with electrical wiring to further reduce the risk of electrical shock. - Test the Connections Before Use
After completing the wiring, use a multimeter to test the outlet and plug to ensure everything is wired correctly and that there are no loose or faulty connections. - Avoid Working in Wet Conditions
Never work with electrical components in wet or damp conditions. Water is a conductor of electricity and can increase the risk of shock or short circuits. - Seek Professional Help if Uncertain
If you’re unsure about any part of the wiring process or lack experience with electrical work, consider consulting a licensed electrician to handle the installation.
By following these safety precautions, you can protect yourself and your equipment while wiring your 30 amp RV plug, ensuring a safe and efficient setup.
Common Mistakes to Avoid
When wiring a 30 amp RV plug, it’s easy to make mistakes that could lead to electrical issues, safety hazards, or costly repairs. Avoiding these common mistakes can ensure that your RV plug is wired correctly and safely. Here are some key mistakes to watch out for:
- Using the Wrong Wire Gauge
One of the most common mistakes is using a wire gauge that is too small for the 30 amp circuit. Always use 10/3 AWG wire, which is specifically designed to handle 30 amps of current. Using a smaller wire can cause overheating, electrical fires, and equipment damage. - Improper Grounding
Failing to properly ground the plug is a critical safety mistake. The ground wire is essential for preventing electrical shock and safely directing any stray electrical current. Always ensure the green ground wire is securely attached to the ground terminal on the plug. - Loose Connections
Loose or poorly connected wires can lead to electrical faults such as short circuits, overheating, or power loss. Double-check all terminal connections and make sure the screws are tightly secured to avoid any risk of arcing or losing power. - Incorrectly Wiring the Hot and Neutral Wires
Mixing up the hot (black) and neutral (white) wires can result in reversed polarity, which may cause electrical devices to malfunction or even damage appliances. Always ensure the black wire is attached to the hot terminal, the white wire is attached to the neutral terminal, and the ground wire is connected to the ground terminal. - Overloading the Circuit
A 30 amp plug is rated to handle only 30 amps of current. Connecting too many high-wattage devices to the circuit can cause the circuit breaker to trip or lead to overheating. Be mindful of the total load on the circuit and avoid exceeding the amp rating. - Not Using a Weatherproof Cover
If you are using the RV plug outdoors, neglecting to use a weatherproof cover can lead to corrosion, moisture buildup, and rust. Always protect the plug with a cover when it’s not in use, especially in damp or outdoor environments. - Failure to Test After Wiring
After wiring the plug, it’s crucial to test the connections using a multimeter to ensure everything is working correctly. Many people skip this step, but it’s essential to verify that the wiring is done properly and that there are no issues before use.
8.Using Worn or Damaged Plugs
If your RV plug shows signs of damage, such as cracks, exposed wires, or burn marks, don’t attempt to reuse it. Damaged plugs can be dangerous and should be replaced immediately to avoid electrical hazards.
- Not Turning Off the Power
Forgetting to turn off the power at the circuit breaker is one of the most dangerous mistakes you can make. Always ensure the power is disconnected before you begin any electrical work to prevent electric shock or injury. - Overlooking Manufacturer Instructions
Each RV plug may have slightly different installation requirements depending on the brand or model. Failing to follow the manufacturer’s instructions can lead to improper wiring, making the system unsafe. Always refer to the instructions provided with your RV plug for proper wiring procedures.
By avoiding these common mistakes, you can ensure a safer and more reliable electrical connection for your RV. Always prioritize safety, double-check your work, and if in doubt, consult a professional electrician to help with the installation.
Maintenance and Troubleshooting Tips
To keep your 30 amp RV plug in optimal condition and avoid potential issues, regular maintenance and knowing how to troubleshoot common problems are essential. Below are some useful maintenance tips and troubleshooting advice to help you maintain your RV plug and address any issues that may arise.
- Inspect Regularly
Periodically inspect the plug for any visible signs of wear, corrosion, or damage. Check the wires for fraying or cuts, and ensure the plug casing is intact. - Clean the Plug
Dirt and debris can accumulate in the plug, leading to poor connections. Gently clean the plug using a dry cloth or compressed air to remove dirt or dust from the terminals. - Ensure Tight Connections
Over time, vibration from travel or use can loosen connections. Regularly check that all wires are securely attached to the plug’s terminals. Tighten any loose screws to maintain a solid electrical connection. - Check for Rust or Corrosion
If you’re using the RV plug outdoors or in a humid environment, it’s important to inspect the terminals for rust or corrosion. If you find any, clean the affected areas using a wire brush or contact cleaner. Apply a small amount of anti-corrosion spray to prevent further buildup. - Use Weatherproof Covers
When not in use, keep your RV plug covered with a weatherproof cap to protect it from the elements. This helps prevent corrosion and wear caused by exposure to moisture or dirt.
Troubleshooting Tips:
- No Power to the RV
- Check the Power Source: Ensure the power source (circuit breaker or outlet) is turned on and functioning. Test the outlet with a multimeter to confirm it’s providing power.
- Check for Loose Connections: Loose or disconnected wires can prevent power from reaching your RV. Inspect the connections at both the plug and power source and ensure they are secure.
- Inspect the RV Plug: If the plug is damaged or not seated properly, it may not make a good connection. Inspect it for any signs of damage or wear, and replace it if necessary.
- Overheating or Burning Smell
- Check Wire Gauge: Ensure the wire you are using is properly rated (10/3 AWG for a 30 amp plug). Using a wire that’s too thin can cause overheating and potential damage.
- Inspect for Loose Connections: Loose connections can lead to arcing, which generates heat. Check all connections and tighten them as needed.
- Check for Overloading: Make sure the devices connected to your RV are within the power limit of the 30 amp plug. Overloading the circuit can lead to overheating.
- Tripped Circuit Breaker
- Inspect for Short Circuits: A tripped breaker could indicate a short circuit. Check the wiring for any signs of damage, such as exposed wires touching each other or the ground.
- Check the Load: Ensure that you are not exceeding the 30 amp capacity of the circuit. Too many high-wattage appliances running simultaneously could trip the breaker.
- Intermittent Power
- Check for Corrosion: If power cuts in and out, corrosion on the terminals or wires could be causing intermittent contact. Clean any corrosion from the plug and terminals.
- Check for Loose Wires: Loose or frayed wires can result in intermittent power. Tighten any loose connections and replace any damaged wires.
By following these maintenance tips and troubleshooting advice, you can ensure the longevity and functionality of your 30 amp RV plug. Regular inspections and prompt attention to any issues will help prevent major problems and keep your RV electrical system running smoothly.
Conclusion
Wiring a 30 amp RV plug is a relatively straightforward process, but it’s essential to follow proper steps to ensure safety. First, ensure that you have the right tools and materials, including a 30 amp plug, wire, and appropriate connectors. You will need to connect the three wires (hot, neutral, and ground) to the corresponding terminals on the plug.
How to wire a 30 amp RV plug? Begin by attaching the hot wire to the brass terminal, the neutral wire to the silver terminal, and the ground wire to the green terminal. Make sure all connections are secure and double-check your work before plugging in the RV. Properly wiring the plug ensures a safe connection for your RV’s electrical system.